Do you want to sharpen an image to stand out on your social media profile, Or maybe you want to unblur a photo to hold the reader’s attention for longer? If that’s the case, here’s some good news. This article will help you with a couple of online software ranging from simplified to more technical ones in terms of usage. Let’s jump into the section to know more.

How does the AI Image Sharpen Software Work?
AI software works by bringing clarity to the soft edges of the photos. It targets and reverses three specified blur types in the image as this software is designed to reduce the blurriness of moving objects.
It also makes the image sharp by minimizing the lens blur. This software ensures a natural appearance and makes the image pop. Undoubtedly you can get jaw-dropping results with online photo sharpening software. But It’s essential to know how to use them properly for the best results.
How to Sharpen Image Online?
Image Upscaler is an online platform that ensures a natural image and makes your image pop. This easy-to-use software allows you to level up the pixels of your photo. Furthermore, the deblurring feature of it points out the small detail of your favorite clicks. This software comes with a background removal feature.
Morely, if you click a picture in bad lighting conditions, don’t worry. This software will enhance the intensity and colors of your photographs. To precisely sharpen the image through this easy-to-use software, consider the below steps.
Step 1: Get to the Image Upscaler
- The first step is to visit a website—type’ Image Upscaler’ in Google’s search bar. On the first page, you will find its website. Or just visit AI Upscaler
- Clicking on Image Upscaler would lead you to this easy-to-use online software with which you can make blurry images clear.

Step-2: Choose the Desired Photo
- On the directed page, tap on ‘Add file or drop files here.’ Options will come up to choose your desired photo.
- From here, you can select the file you need to sharpen.

Step 3: Wait for Image Processing Sharpen
Once you choose the file, this software will start to process your image for better details. This process will take hardly one minute or even a few seconds to sharpen the image features.

Step 5: Save the Image
After processing, you can see the difference in how beautifully it sharpens the features of the pictures. Save the image on your device by clicking on the download button.

How to Sharpen Image with Aiarty Image Enhancer
Aiarty Image Enhancer, powered by deep-trained AI algorithms, is designed to help users of all skill levels enhance and upscale their images effortlessly in just a few clicks. It effectively reduces blur, graininess, and noise, producing sharper, cleaner images with stunning detail.
Additionally, you can upscale your photos by 2x, 4x, or even more, achieving incredibly sharp resolutions of up to 32K. With five specialized AI models, the tool optimizes different types of images, ensuring the best possible results for every project. Let’s follow the steps below to sharpen images with this AI-driven image sharpener.
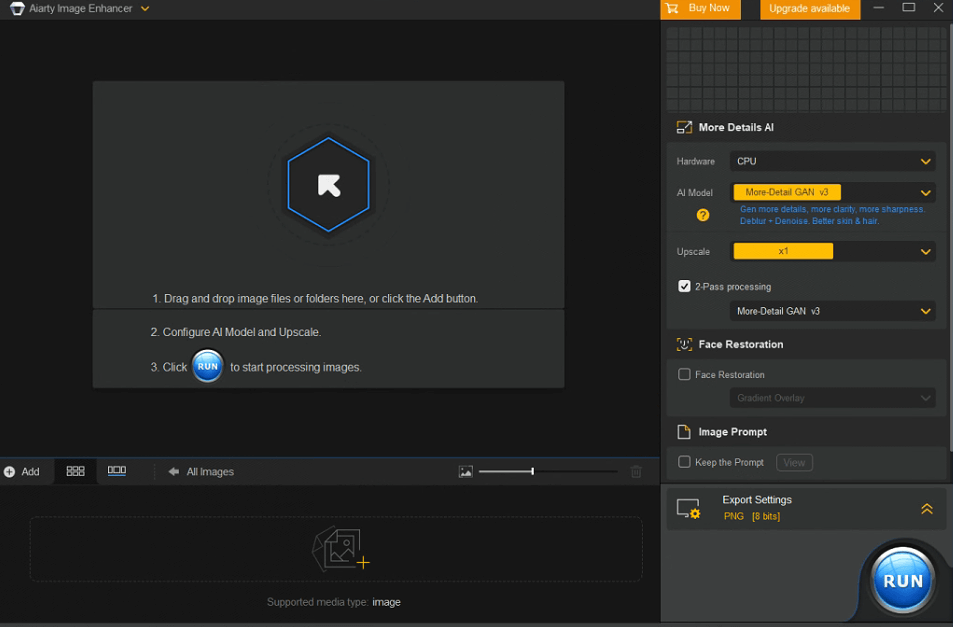
Step 1: Import Your Photo(s)
Start by downloading, installing, and launching Aiarty Image Enhancer. Then, simply drag and drop your photos into the application – it’s that easy.
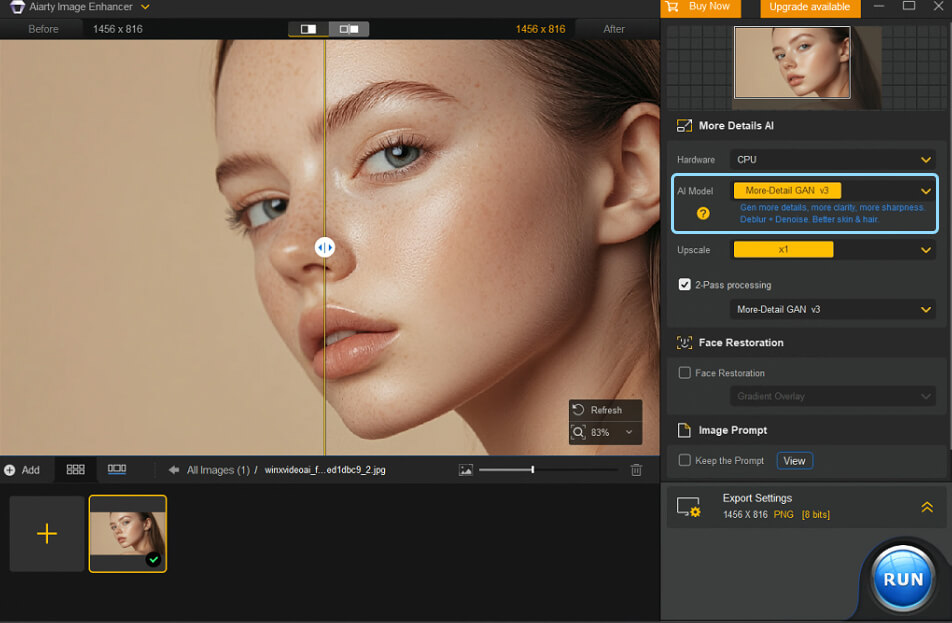
Step 2: Select an AI Sharpening Model
Pic an AI model from the AI Model dropdown menu. For images with lots of details, Real Photo V3 and Gen Detail V3 are great choices and highly recommended. Feel free to experiment with the other models to see what works best for your image. Once you select a model, the software will automatically start sharpening your photo.
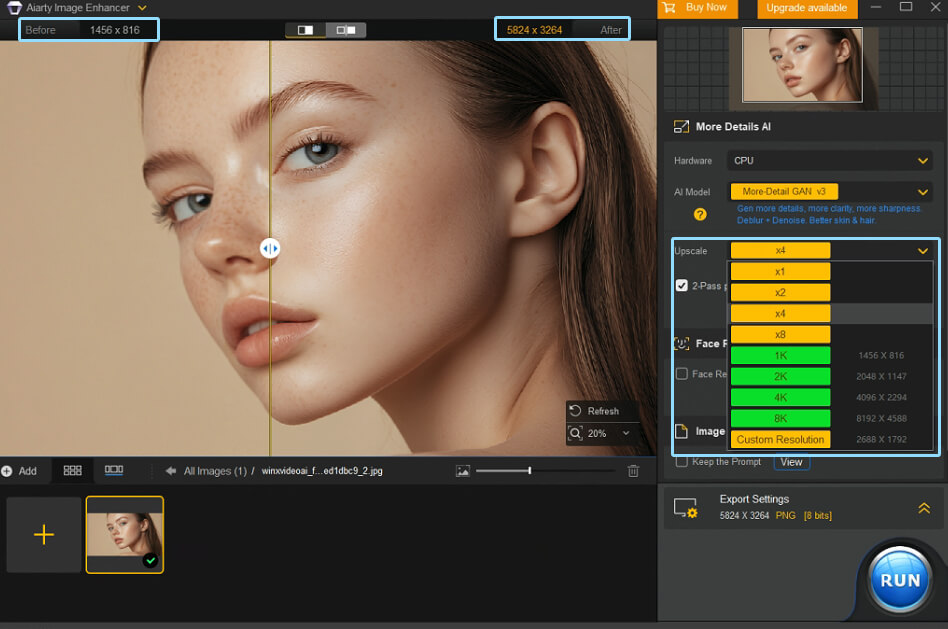
Step 3: Choose Your Output Resolution (Optional)
If you’d like to resize your image, head over to the Upscale section. You can enlarge your photo with options like 2x, 4x, and 8x. If you have a specific size in mind, you can choose resolutions like 1K, 2K, 4K, or 8K.
Step 4: Save Your Enhanced Image
Click Single Export to save the enhanced image to your computer. If you’re working with a large number of photos, you can hit Batch Export to save them all at once.
Sharpen Your Image Using Photoshop
Sharpen image Photoshop can be tricky, especially if you are doing it for the first time. Using this technique to unblur an image will surely blow your mind. If you are wondering how to make a sharp image using Photoshop, don’t worry. Here’s a practical solution for you. You can download Photoshop on adobe.com
Step 1: Zoom in the Photo
After getting your picture on photoshop, the first step is to zoom in on the area you want to work on. You can easily do it by double-clicking the magnifying glass at the top of the image.

Step 2: Duplicate the Layer
In the second step, create a new layer of the photo by clicking on the last option on the row present on the right-hand side of Photoshop. The other way to duplicate the image layer is by pressing Ctrl/Cmd+J.

Step 3: Go for the Unsharp Mask
Click on the filter present top of the image. In the filter option, you will find ‘sharpen.’ When you hover the mouse over it, you will encounter many options. Choose the unsharp mask option from there.

Step 4: Adjust the Settings
In the further step, adjust the settings in the unsharp mask window. Here go for the radius of 1.5 and the amount with 181 as it essentially makes a sharp image.

Step 5: Choose the Blending Options
In this step, go for the FX to select the blending option. Once the advance window opens up, go for the second last option. Here move the white reading to the middle to give a special effect to the images.

Step 6: Select the High Pass
Here, click the filter present on the top of the image and go for the option ‘others.’Choose ‘high pass.’ A window will pop up before you. Also, you can easily observe the little outlines of the image.

Step 7: Adjusting the Parameters
In this step, it would help if you were careful while selecting the radius. The higher you go, your picture may get wired. Choosing a mid-range would be perfect for sharpening your images. Here, 1.5 radii would be ideal. After that, press okay.

Step 8: Choose the Layer Option
Once you are done with high pass adjustments. After that, you can choose the layer option in the right-hand side row. Here you will find multiple possibilities like soft light, vivid light, and hard light.
You can adjust the details and sharpness of your images with these options. See what goes perfectly to unblur a photo.
You can save the image on your device when satisfied with the adjustments. These settings would make a massive difference in making a sharp image.

How to Sharpen Image Using GIMP?
GIMP is another powerful and accessible tool for photo manipulation. This hugely popular tool is a good substitute for Photoshop as well. To know how this tool works, follow the below steps.
Step 1: Choose an Unsharp Mask
In the first step, you need an unsharp mask as it’s the best gimp image sharpen feature. You can easily find it in the filters option at the top of the picture. In the filter options, clicking on ‘enhance’ will access you with an unsharp mask feature.

Step 2: Adjust the Radius Setting
When you hit on the unsharp mask and let the window open up, here, you can play with the settings—the three parameters you can perceive through the mask window. For the radius selecting 1 and 2 will be okay. Radius is usually used for wide pixels from the edge of an image. 
Step 3: Strengthen the Sharpness
The second parameter is the ‘amount’ used to strengthen your sharpening. It’s a measure of how different you want your neighboring pixels.
Especially when you sharpen and steep the gradients while comparing from left to right of the image. Let its setting be to .5, as it’s a good number for making a sharp image.

Step 4: Adjust the Threshold
For the threshold parameter, you can set the setting according to your choice. It facilitates you with an option to make a sharp image through all the edges of a picture or the prominent edges.
GIMP will only sharpen the photo’s boundaries if you choose the large threshold number. But for the small threshold number, it would point to the advantages everywhere in the image.

Wrapping up
Sharpening your image not only makes it crisper and pop but also enhances its minor details. I hope the diversified options discussed in this article will help to unblur your photos more professionally. However, going for this Image Upscaler will get you more as its process is simple and doesn’t require much technical detail to get a picture with more defined features.


